Avoid These Common Mistakes to Play Well in First Position on the Violin
How to play well in first position on the violin? Avoid the following common mistakes. Play better now! First position is the position that is first learned on the violin and in many ways it is underestimated as a very important aspect of building a healthy foundation for your entire violin journey. If first position technique is learned incorrectly and bad habits are allowed, then these bad habits will occur in every other position on the violin, like a parasite that has found a healthy host to prey upon.
In this how-to play well in first position on the violin post, I will discuss the 4 most popular first position pitfalls and teach how to avoid them in order to have better intonation and improved technique.
Don’t fall into the following first position pitfalls, practice finger pattern exercises written specifically with these issues in mind from my “Strengthening Exercises for First Position!” As it is 100% immediately downloadable you can start now. This violin exercise book educates violinists on how to excel in first position via six most common first position finger patterns. These exercises are great for the beginner violinist wanting to master first position and the seasoned violinist wanting to discover and heal any intonation inconsistencies.
Proper Posture
In order to play well in first position on the violin, it is ABSOLUTELY IMPERATIVE to have proper left hand posture or everything said in the post is completely null and void.
Need more left hand proper posture training? Check out How to Get Rid of Left Hand Tension.
Now that we have set an excellent left hand foundation, let’s get to the nitty-gritty details of how to play well in first position on the violin by avoiding the following first position pitfalls.
Sour Threes
The search for the perfectly in tune third finger, “Ringing 3.”
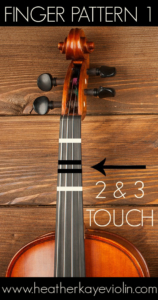
The first finger pattern learned on the violin is a high two and a normal three in which the second and third finger touch. I clearly remember a violin teacher of mine stabbing a pencil between my second and third finger when I didn’t get them to touch as they should. It wasn’t the eraser side either…
Anyway, the first step to avoid sour threes is to train the ear to listen to the ring of the third finger. The third finger plays the notes “C,” “G,” “D,” and “A” on the violin in first position. The notes G, D and A all have a special ring or sparkle no matter where they are played on the instrument because when played, the open strings resonate. Thus the “Ringing 3.”
Even the third finger on the G string for the note “C” has a ring. If a four string violin was to have five strings the lowest string would be C. Open G to C is a perfect fourth which sounds like the beginning of the wedding march.
Don’t know what a perfect fourth is? Need more music theory training? Check out Music Literacy – How to Read Music and More E-Course.
Second Finger Identity Crisis
Lack of finger recovery from a low two to a high two and vice versa.
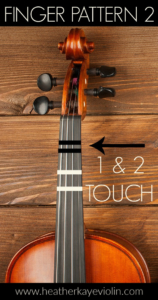
Low second finger or low two as it is commonly referred to is the next finger pattern taught after “High Two,” or high second finger. When low two is introduced it is typically difficult for the student to master finger recovery. I call it the second finger identity crisis: is it a low two or a high two. The second finger needs to be able to play low two and recover to play a high enough high two and vice versa. There is no middle ground.
Also, low two is typically taught to feel the second finger touch the first finger or be the skier down the first finger ski slope. At first, yes it is important to get the second finger low enough to touch the first finger. Do keep in mind that if the fingers are small and slender, there might be a slight space between the first and second finger even though it is a “low two.”
Raphael Bronstein discusses this in detail in his out of print book, “Science of Violin Playing” in the visual intonation section. I was lucky enough to have a teacher share his edition of this wonderful book with me.
Misconceptions of High Three
High third finger commonly known as “High 3” getting high enough.
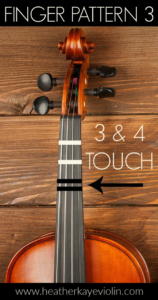
High third finger is when the third finger touches a normal fourth finger. In this finger pattern, the danger is that the violinist thinks they are playing high three because it is touching the fourth finger but the fourth finger is low and not in tune. Play high three on the inside corner of the finger to allow it to be snug behind the fourth finger and improve pitch accuracy.
Also, watch that the second finger does not creep up higher because the third finger is higher.
Practice what I call “243” which is the second finger followed by the fourth finger. Check the fourth finger with the corresponding open string that your fourth finger is in tune and then place your third finger behind the fourth finger while still holding the second finger down. I explain this exercise in detail with video training in “Strengthening Exercises for First Position” E-Course.
Free the One
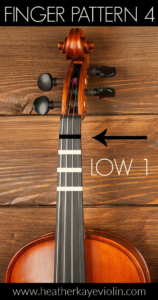
Low first finger commonly known as “low one” pulling the entire left hand flat.
This finger pattern is the most troublesome finger pattern and the most notorious finger pattern to derail the entire left hand.
Why you may ask?
Because this finger pattern played without proper technique can influence every finger to play flat.
When playing low one it is absolutely imperative to unlock the first finger from the knuckle and lean the first finger back. Because the first finger is the most dominant of all the fingers it has the power to pull the entire hand back low to almost what would be considered half position. Also some violinists while setting their left hand up with a low first finger actually use that first finger as a reference point for the left hand and the entire left hand is flat.
Do you learn better from demonstration and explanation? You will LOVE my Strengthening Exercises for First Position online eCourse! Discover even more first position finger pattern pitfalls and how to avoid them with violin lesson videos.
Happy Magical Practices,


